

Fantasy Art & Illustration by Sarah Wright

Costumery & Props
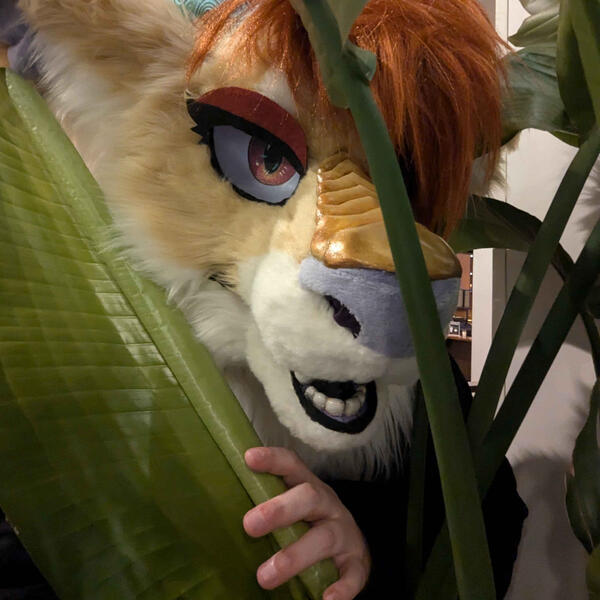
Anzu
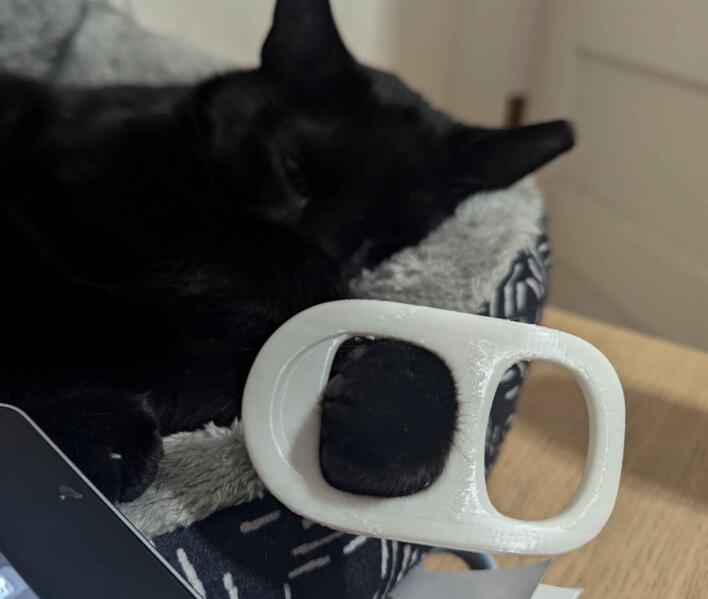
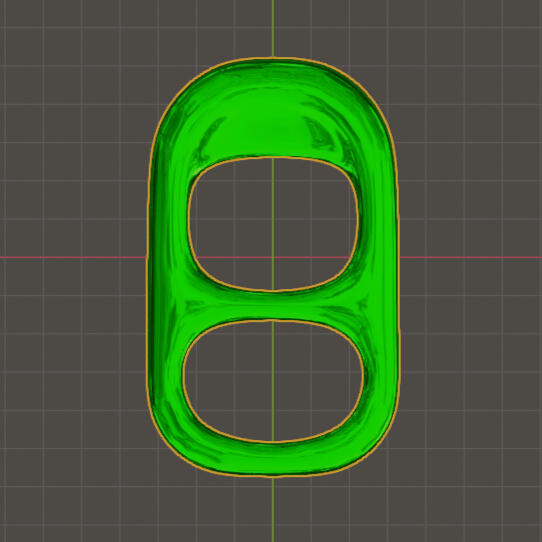
Giant Pop Tab Cuffs
Giant Pop Tab Cuffs
3D modeled and printed Pop tabs channel the whimsy of large versions of everyday objects.

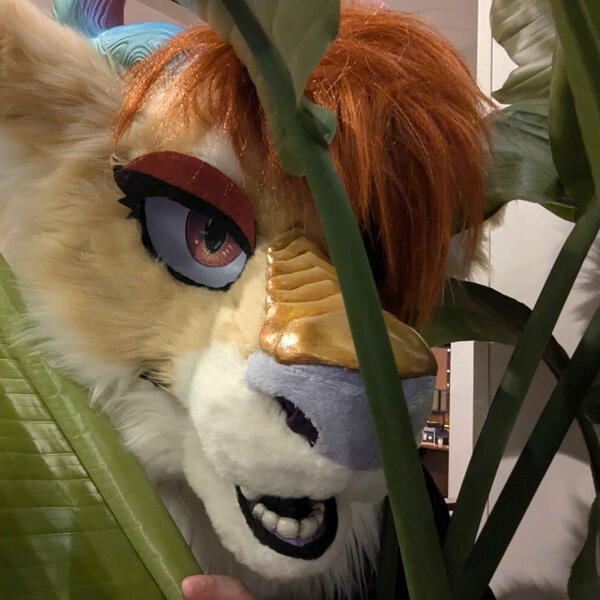
Anzu


✨ Noodle dragon head base model by Maimface
✨ PLA plastic filament (3D printer filament)
✨ CA (super) Glue and Excelerant spray
✨ Barge/Woodweld (Contact Cement)
✨ 1/2-inch upholstery foam
✨ 1-inch upholstery foam
✨ Varying sizes of EVA foam
✨ Some kind of springs
✨ Elastic band
✨ Hot glue and glue gun (both regular and gorilla glue sticks.)
✨ Some kind of Athletic material (Spandex Blend)
✨ Neodymium Magnets (10 ib magnetic strength)
✨ Acrylic Paint
✨ Krylon Triple-thick Crystal Clear Glaze
✨ Screen Mesh
✨ Several Yards of Faux Fur (I got a yard of each color to have extra)
✨ Minky (1 yd)
✨ Gold Vinyl fabric (for the nose)
✨ Pellon Featherweight Fusible interfacing
✨Wood Filler and acetone
✨ sewing clips
✨ Stiffened Felt
✨ Velcro
✨ Paint markers, acrylic paint, and colored pencils
✨ Sminiker Pet Shaver
✨Braiding hair/ Kanekalon
✨ Sport netting/Mesh
Starting Out
This documentation was done in approximate chronological order. There are things mentioned or tried in earlier stages that change in the later stages of the process. This documentation includes ALL parts of the making of the head including things that worked, things that didn't, and things that changed along the way.I didn't really start out with a plan for this one. I know it's common to start with a reference or sketches of a desired character but I opted to, instead, find a head base shape I liked and could find the potential in. I felt if I designed the character for this I would be impatient with building the foundation for it and would ultimately dislike the end result for not living up to my imagination. I hoped that by finding a base I liked and focusing on just making it a functional base by itself I could alleviate some of the pressure of having to match a character perfectly while learning multiple unfamiliar skills and processes.
Hinging & Padding the Head

Fauled Padding attempt 1: interior

Failed Padding Attempt 1: profile ( You can see how the head pulls down. My head needs to be more aligned with the features. My chin needs to be farther back and my mouth/jaw lined up better with the head mouth/jaw)

Failed Padding attempt 1: Limitation in Jaw movement (The poor alignment results in the head pulling down and limited/ineffective jaw response)


I started with a 3D-printed base by Maimface. They were kind enough to put some of their old models on Thingiverse free for personal use.1 I also printed the recommended spacers and the accompanying teeth and eye plates.Using CA Glue and exelerant Spray, I glued the parts of the head together and ran a light bit of hot glue over the seams to further secure the head parts.The next step was hingeing the jaw and padding the head to make it functional as a wearable object. After some research on hinging and padding heads, I found that the methods were variable, and the most important thing was to create something comfortable that doesn't slide around—snug but not tight.There was a video on TikTok showing how another individual hinged the same head-base and I followed that for aligning my springs and spacers. Maimface has a pattern on their Linktree for a "half-bucket" to be used to pad and provide backing for the bases. I started off with 1/2" green upholstery foam. Unfortunately, What I found was that the padding seemed insufficient and the range of motion in the jaw was very limited.One suggestion by Rumeria and Enochtus of Fursewna Studios was to move the spring forward and provide more padding in the forehead to reposition the head so the mouth aligns with the suit mouth more deliberately. Unfortunately, the interior of the model made moving the springs forward less of an option.After Scouring Maimface's Instagram, I found that they were using a thicker foam for the half-bucket form and had moved to a different hinge type. I decided to try again to hopefully get better results.

Padding Redo (side)

Padding redo (interior)


I tore out the foam and spacers, I ordered some printed hinges off of Etsy and decided to go in for a take-2. The hinge still didn't work well with springs so I switched to using elastic.The 3D-printed pieces came with instructions to try them on both the inside and outside to see what worked better. I would have preferred the hinges live tucked inside the head but design of the head made it so that placing the hinges on the inside didn't secure the jaw well enough. I also found that elastic worked better in this instance than the springs.Thicker foam also secured the head better. I referenced this Instagram post for the foam placement and adjusted from there. My head is small so I used a half inch more foam on the back. The jaw fits snug but not uncomfortably and is responsive. The foam doesn't press into my throat when positioned correctly and the upper part of the head does not move when I yap.
Lining the Head
Lycra or Neoprene are almost universally recommended for lining the head with other alternatives being some sort of moisture-wicking athletic parallel. I chose a stretchy athletic material based on what I could find at a local Joann Fabrics.After reviewing various methods for lining the interior I settled on patterning the inside using masking tape. This will, hopefully, create a more spacious feeling interior.

Half of the head pattern

Cut and sewn pieces (side) : I did mistakenly sew the wrong side of the top part of the head, I'll have to seam rip and resew it correctly.

using pins to test the interior.

Testing the interior: the mouth is not glued/secured.


Initially, The pattern I made had a lot of curves I couldn't math out how to sew properly. I modified it on the fly to mostly use straight, linear seams instead to spare myself the headache. Because this was going to be an element that wasn't as visible (and its personal piece) I felt okay improving some decisions on the seams. I gave everything a large seam allowance which I think helped because the fabric itself was very slippery. I don't have a walking foot on my machine so I just wanted the best chance at getting clean seams.I did find that a zig-zag stitch was more effective for the fabric's stretchy nature but my machine was turned off and I forgot to reset those settings for most of the head. I think the straight stitch will suffice once it's all glued down. The zig-zag stitch happens to stretch with the fabric more readily so It's likely the best option for avoiding tearing.

lining is clipped and pinned to test the sewing.

You can see the pins on the inside

Stretched and glued in place as best As I could

The mouth and teeth Glued in and the eyes were cut and some of the fabric brought forward and glues to around the edge of the eyes

another angle

interior head


Gluing down the lining was a rough process. I started by carefully running a small line of hot glue down the center of the base and pressing the center seam of the liner into it. I tried to find the best attachment points for the liner that would result in it converging the base. Originally, I had patterned in an extra bit of fabric for the jaw hinge but ended up not connecting them and just securing it around the jaw as far back as I could without glueing down the bit of liner I wanted to attach to the neck.I ran into issues being able to see and reach into the base which has the jaw hinge very perminantly attached. Removing the elastic gave me more clearance but not much.Some excess was left around the mouth and the head opening in case I need more allowance to sew things to it later (such as the neck lining or the edge of the mouth)It was very clumsy but functional. I think, next time I would like to try and pad the head but keep the jaw in a way where it could be removed so the fabric can be pressed in with the pieces separated for better accuracy before being reattached.Another method I would consider instead is the "snail boy" method of creating a general balaclava shape with more open tubes running to the opening of the eyes (seen in this pattern here) with an opening for the mouth and mouth lining.I did have to make alterations for the teeth as the top jaw fabric stretched a little too much and would push the dentures out. It's comfortable enough to where and doesn't slide so I'm going to call this a win.
Preparing for Fur!
With the lining complete, I set out to order fur. I had worked on a rough color palette briefly to try and gauge some ideas. There is room for the character to evolve because I wasn't starting with one in mind; Rather I'm building a character and making decisions based on my current skills, resources and limitations.

Concept Sketch

color palette

fur choices


I talked to friends about interesting colors and themes and used coolors.co to help inspire/narrow down a color pallette. Once the idea was chosen the furs were sourced. Big Z Fabrics had a large assortment of colors and I decided to use this recommended site so that it would all ship at once. I plan on painting most of the gold and opalescent accents as they will appear mostly on the horns and nose ridges which are intended to be a more rigid material.
The PlanWith the concept sketch, I had a better sense of what features to plan for. While I wait for the fur I decided to start working on some of the exterior features that I could. broken down these would be:➢ Padding for Facial Features
➢ Ears
➢ Teeth
➢ horns
➢ Head Gem
➢ Nose plates
➢ EyesThe plan for the horns is to use EVA foam to create the form. It's more rigid and can be painted and carved into to give more variety to the material consistency and more naturalistic feeling to the horns. Ultimately I'd like them to be magnetic and easily taken off or swapped out. Eno and Rumi, the makers behind Fursewna Studios, were kind enough to inform me to opt for neodynium magnets with a 10-pound magnetic strength so they would be viable and hold the horns well even under a layer of fur.They were also kind enough help me with the eye mesh. While buckram is recommended, they advised me that screen mesh tends to buckle less over time.The dentures can also get painted while I wait for the fur.The head-gem, will likely also be magnetic and made of a 2"cabochon with a painted back to make it look similar to opal.
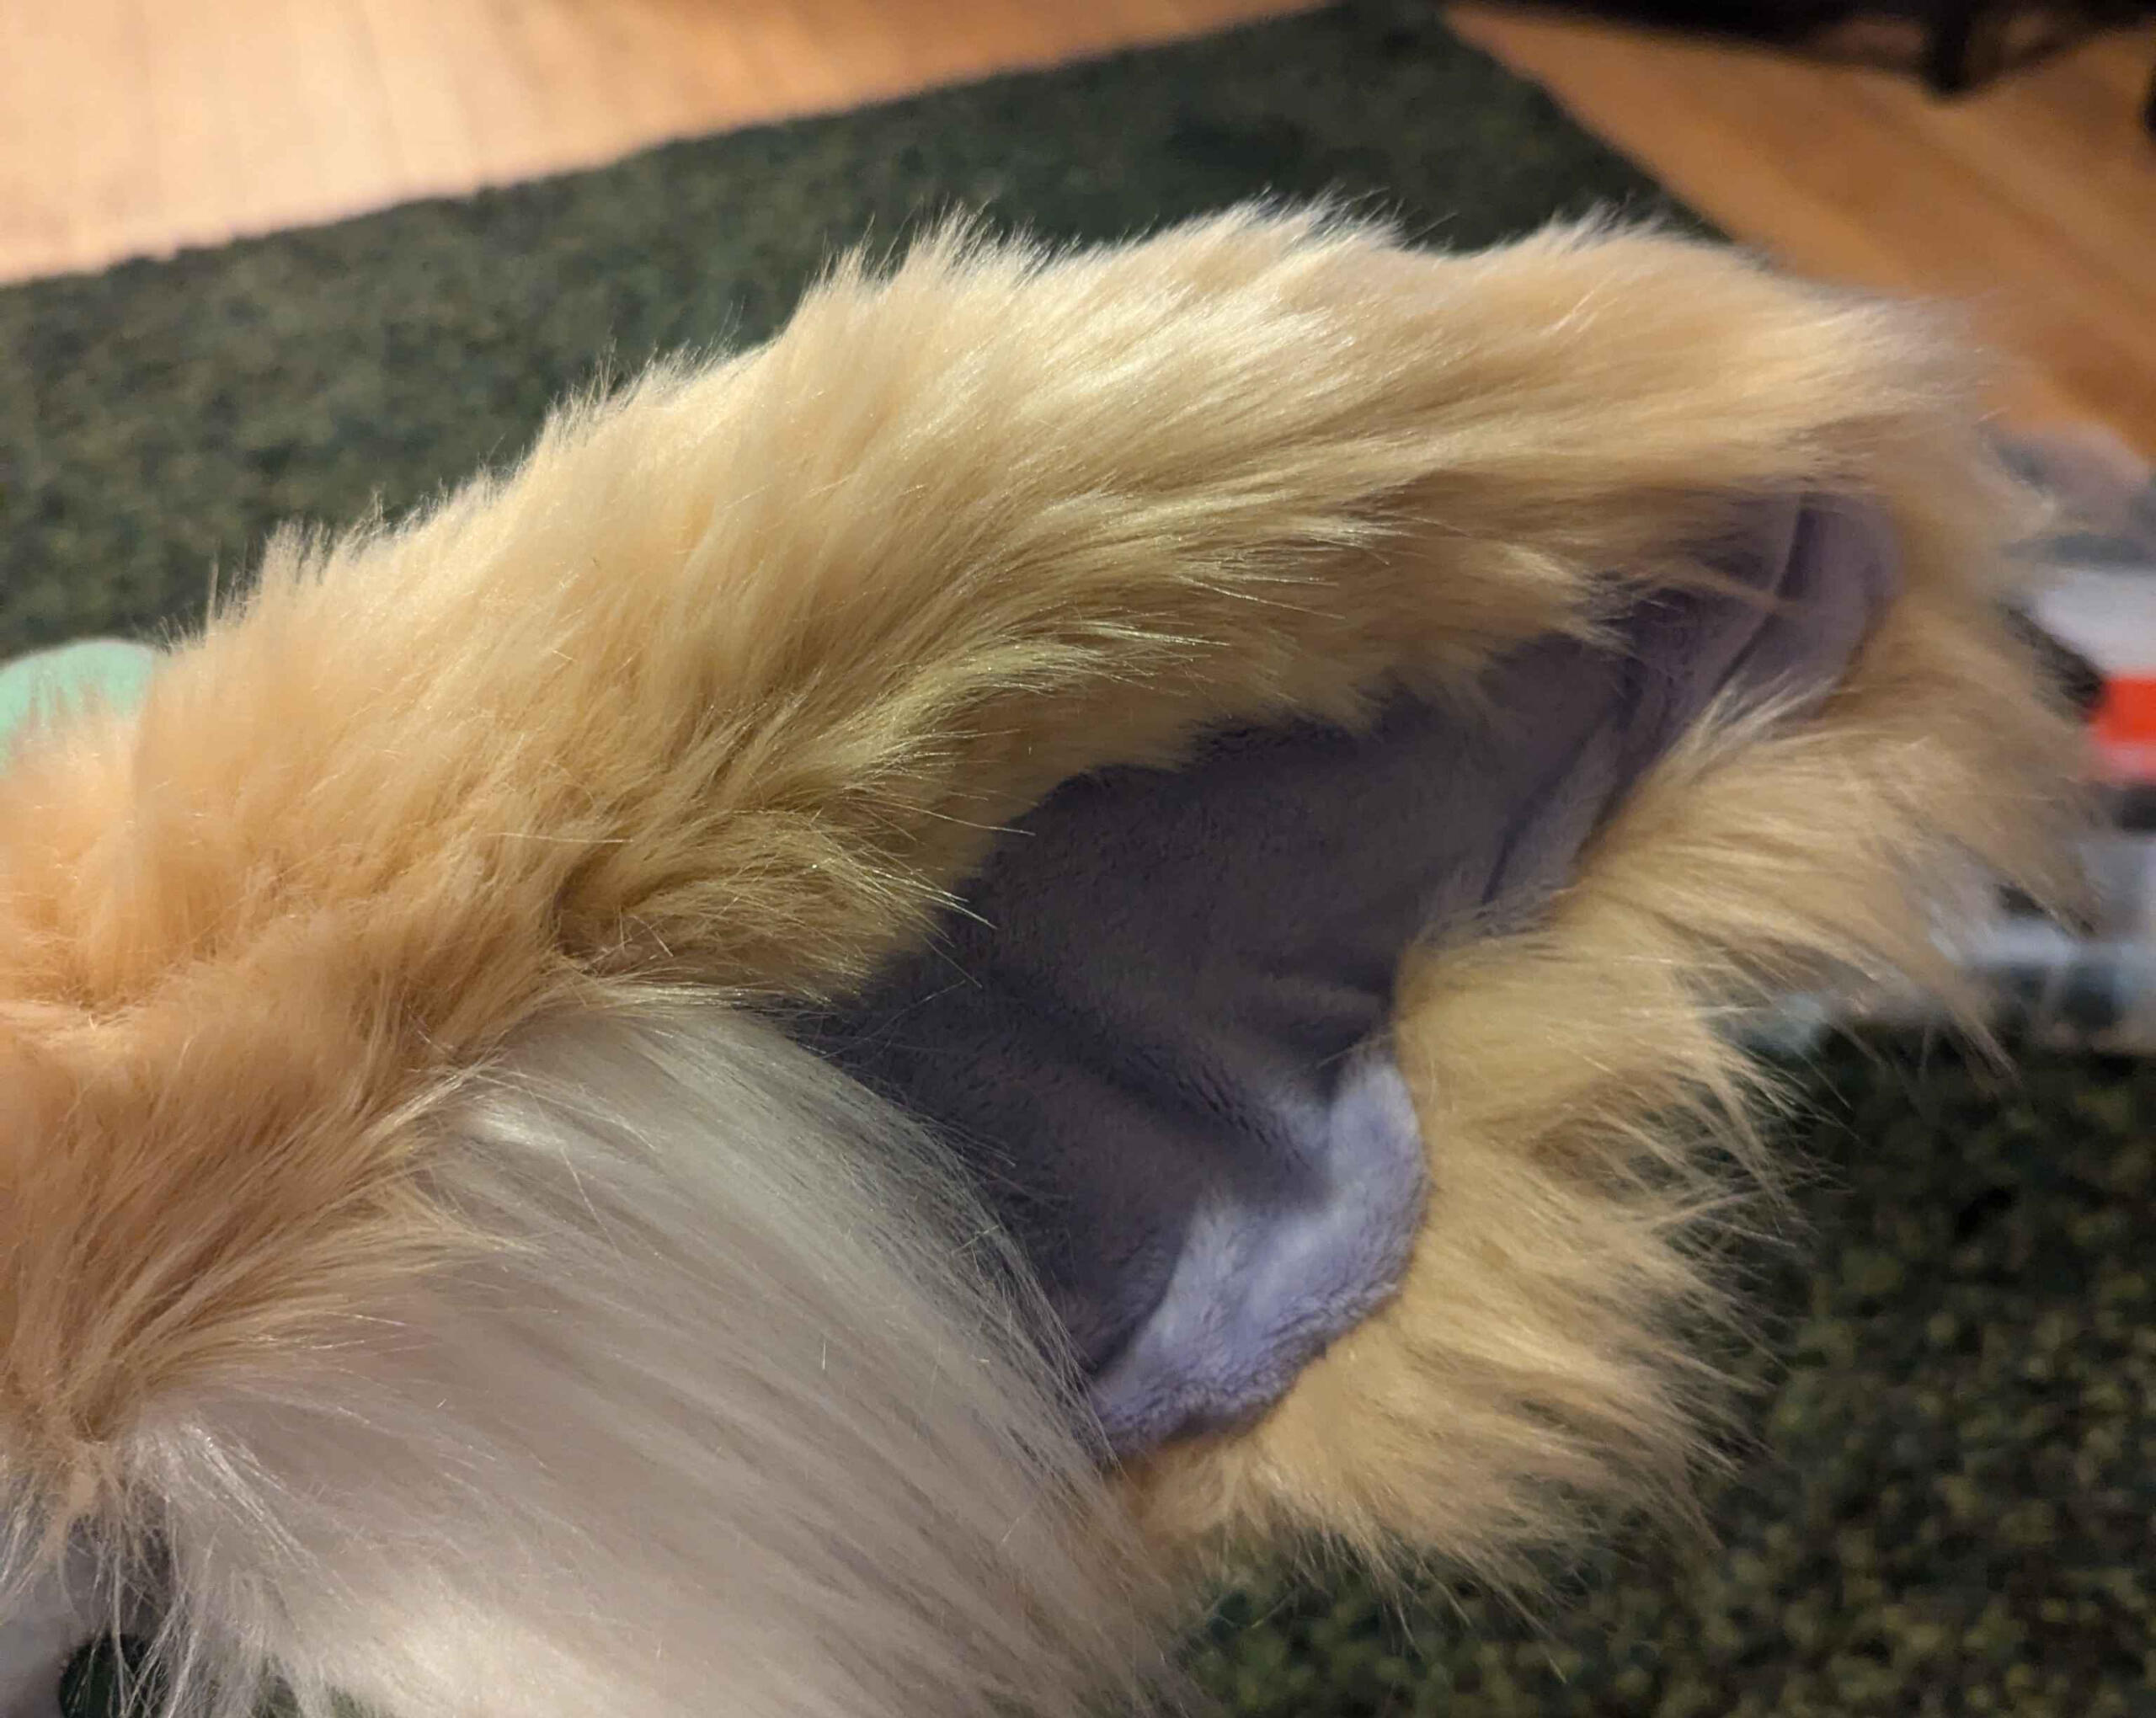
The Facial Features & EarsI knew from this video ( here) that I wanted to hide the jaw gap using a long pile fur and a piece of foam over the hinge. My hope was that it would also conceal the fairly bulky hinge as well and let me fur around it with more ease.Then I shaped the ears! I tested many shapes with paper before settling and building up the ones pictured above and built the shape up with foam. The idea would be that the thinner foam gives the ears a little flop when the weight of the fur is added.
I opted not to glue them down right away as I felt that it would be easier to fur them first and then attach with interior foam with glue and use a hidden stitch to attach it to the rest of the fur on the face.After these key features, I decided to draw over the photo of the head in its current state to see where the concept was and to start planning the other elements of the character.
and figure out where I was in the original plan.

preparing features

front

paintover


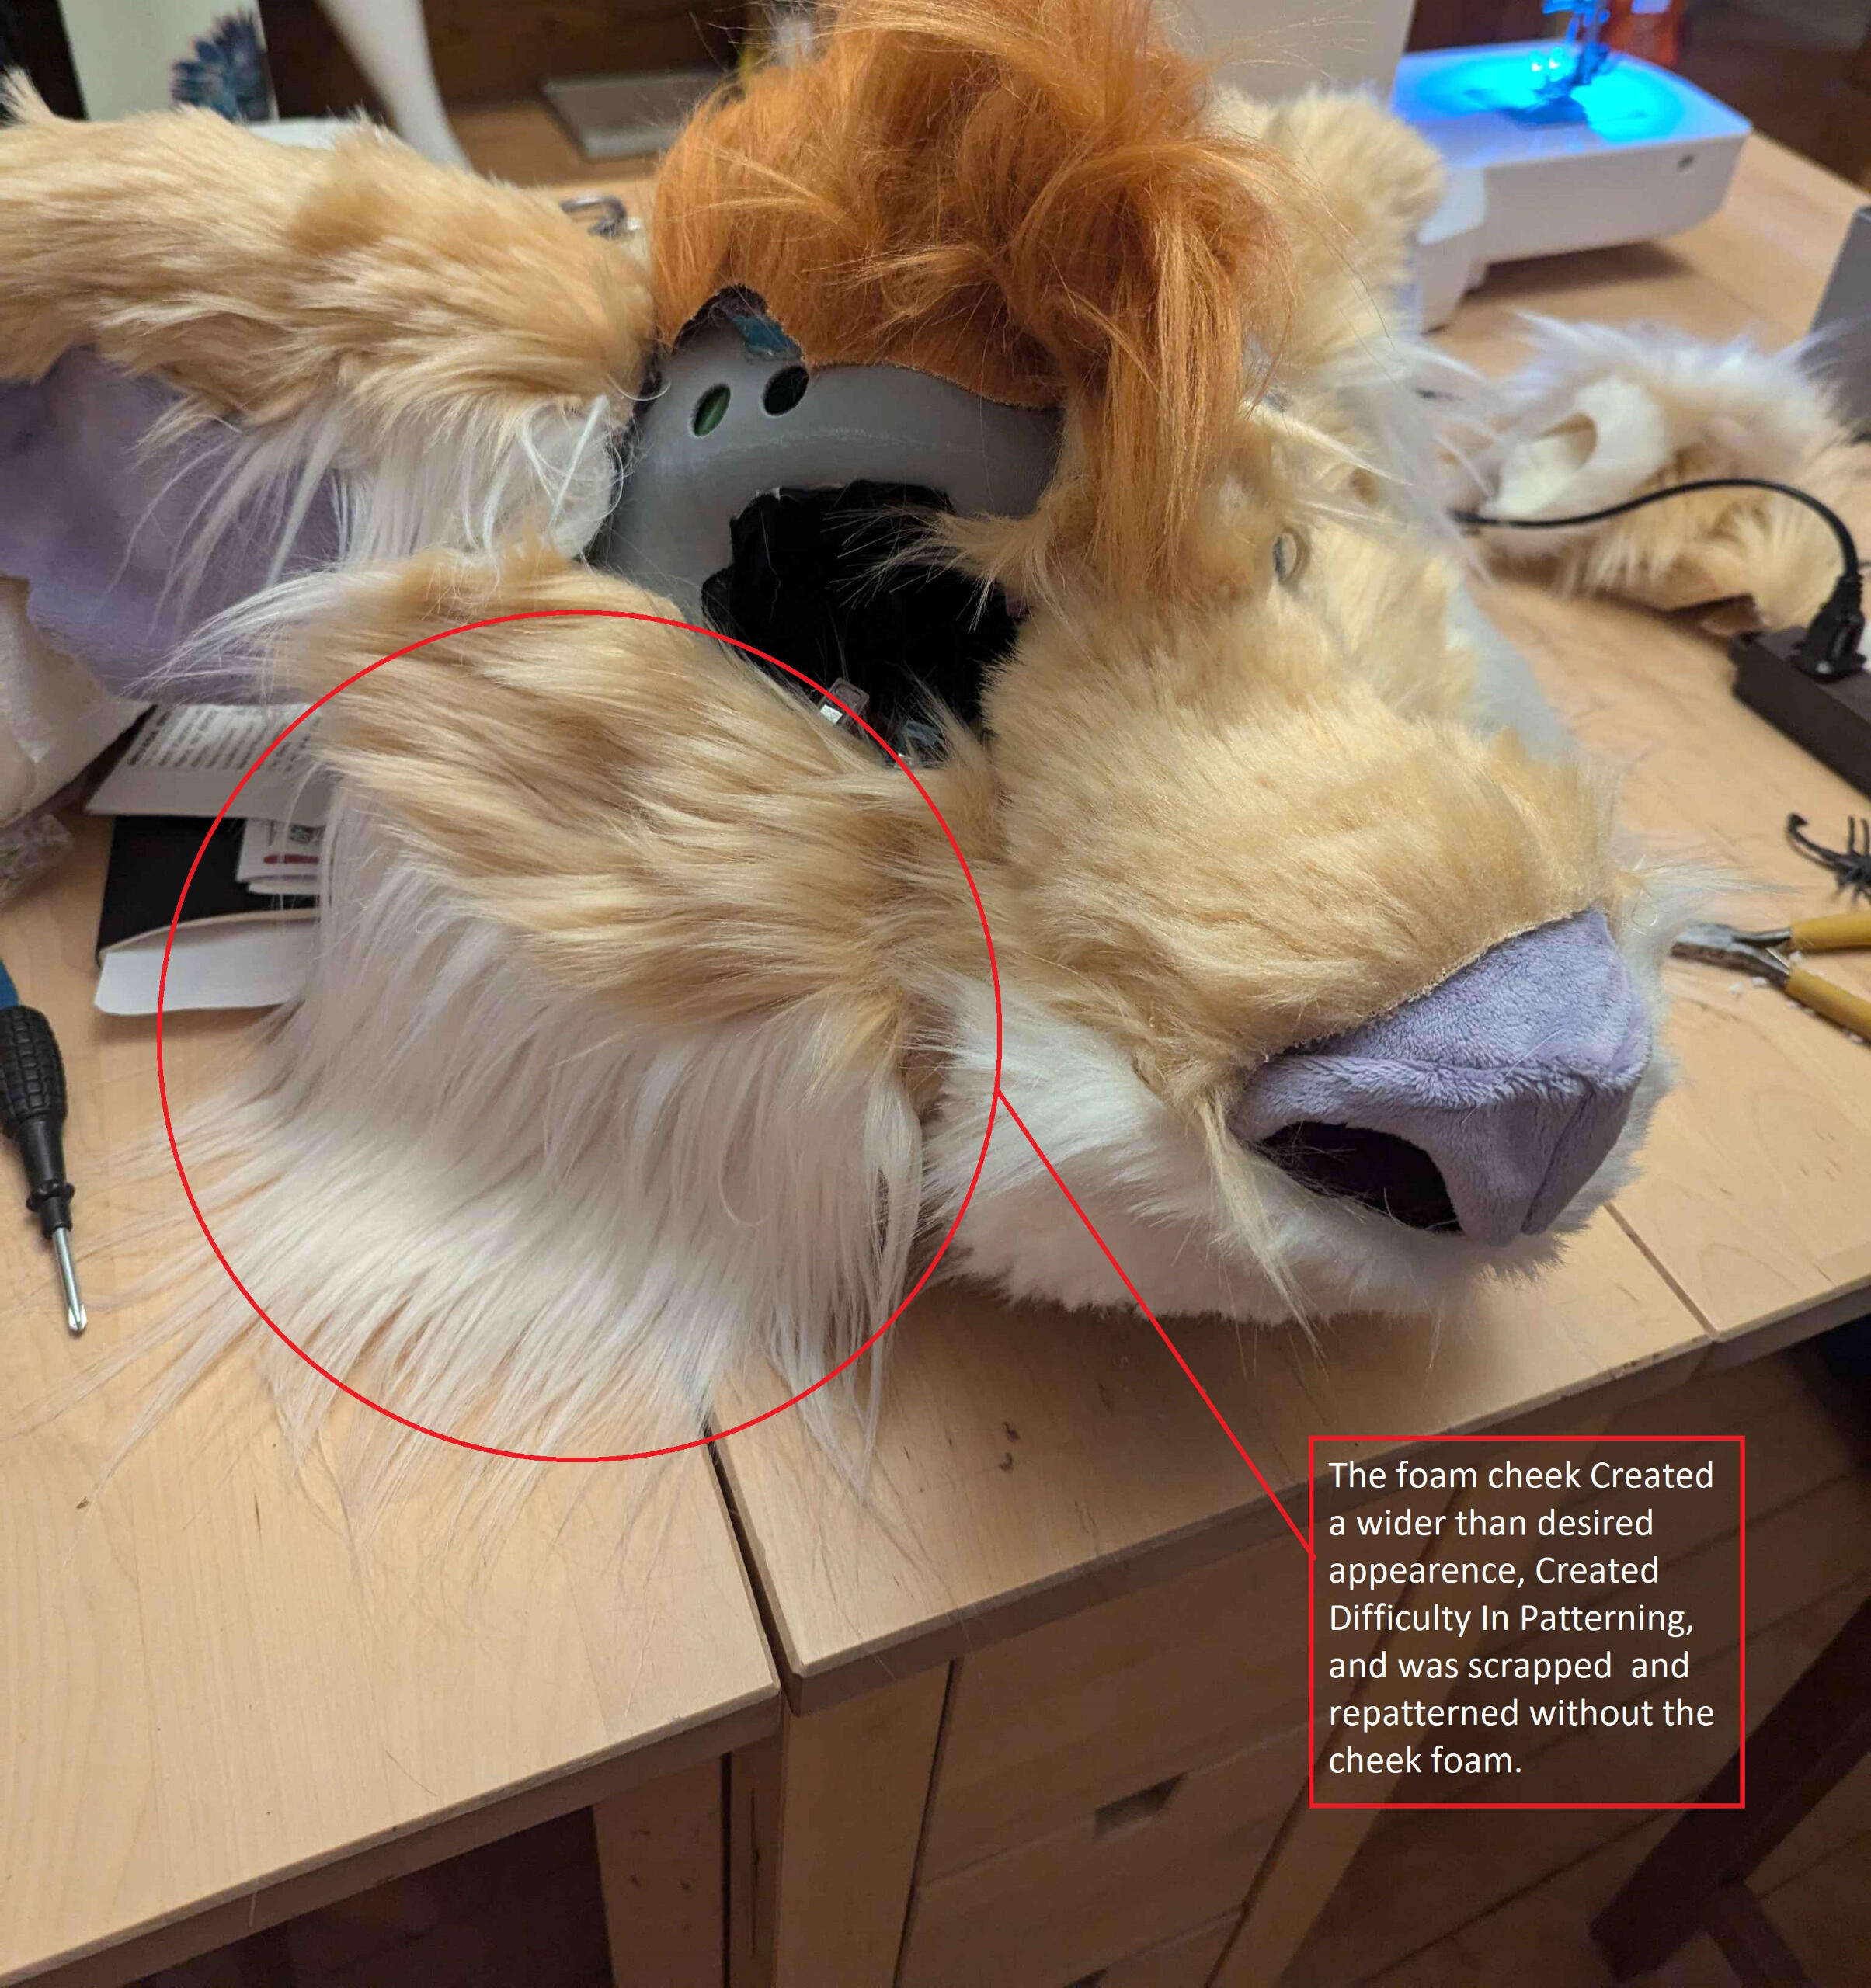
I tried re-positioning the foam. I had tried to taper the hinge-cover to blend with the cheek more naturally but I wansn't happy with the ledge it created. there was a possibility it would make an unpleasant shape under the fur where the face fluff stuck out more than desired. I tore it off gently and found that If I flipped the pieces and pressed the tapered side lower on the face It didn't obscure the cheek definition as much and seemed to lay more naturalistically along the jawline.You can refer to the above images of the applied cheek foam and see that the ledge attached to the face is diminished.

Eyes plates and fluff removed

re-positioned fluff foam


The TeethI used acrylic paint to paint the teeth. When I was done I used some super gloss modge-podge as a coating to create a glossy effect.
The mod-podge left them feeling tacky and I tried spraying them down with Krylon Triple-thick Crystal Clear Glaze. The hope is that once it fully cures it will still retain the wet shine and also be a more moisture resistant coating with no "tack".

Teeth Painted

Teeth- coated with super gloss modpodge


The HornsI first attempted to download a pattern and make the horns out of EVA foam. Direct foam craft is unfortunately not one of my practiced skills. It went a little sideways. The biggest issue was that I didn't bevel the foam nearly deep enough and the foam I was using was way too thick. A thinner foam and more aggressive bevels may have given me a better base to work from when following the pattern. I was unable to cleanly glue the angled pieces together and you can see that in the image of them below.

I pivoted with the arrival of our new 3d printer. My partner and I are experienced with 3d printing and with 3d software from prior projects and interests, so this pivot allowed me to custom-make horns more deliberately in a manner that I was more fluent in.It took some time to sketch and find the right style of shapes for the horns. I wanted them to be a fairly unique feature on the head and move away from more common shapes for dragon horns. There isn't anything wrong with those shapes at all, but I wanted to make something that pushes the envelope a little more. Once a design was settled on the process took a couple of days of working with the model and figuring out the best method for working with high-resolution mesh.I initially sculpted a design similar to the EVA pattern in Nomad, Displeased with it, I asked friends and my partner for feedback and after several iterations when to Blender to model the horn. I tested many features available in the sculpting section. Ultimately, What ended up working was using a curve to manipulate a base tube and tapering it at each control handle to my liking. Then, converting it to mesh and using a multiresolution modifier to sculpt some organic edges and curves into the mesh. After that, I used procedural shading nodes inspired by this tutorial. to create a swirling texture I was happy with. I was able to bake the texture by following this tutorial here and putting the resulting baked texture map into a displacement modifier. Since The nodes can't be applied to the mesh this was important for making the details an actual part of the mesh. I was able to apply all the modifiers to make a high-resolution, dense and detailed mesh. I used a re-mesh modifier to clean up some of the broken areas left behind by the displacement modifer. I was able to use booleans to trim the base of the horn to match the shape and curve of the head.

Critique

I plan on using a tri-color filament and attempted to render the horns in similar colors

The final mesh

horn placement and scale

Boolean'd Horn

boolean'd horn without the head

final look


During this time, the FUR ARRIVED!

Once the horn model was ready, It was time to print them! I ran several tests to determine the best settings and printing angle for the print. Ideally, I would have a clean print with as few supports as possible and an easy time removing the print from the necessary support structures. In this case a more vertical printing orientation seemed to get best results. Because the object is so large at its intended scale, I also opted for a slightly lower resolution to speed up the print time. The layered textures missed with the swirling pattern may even benefit the intended "horn" look. The swirls seem to also get more pronounced at larger sizes.
I'll be able to flip the left horn to print the right.

Test prints

Test prints flipped over

Ready to print!


The horns were then scaled to full size and printed. Intending to make the horns modular, I planned to install magnets on the head and the horns so they could be removed or replaced moving forward. The Magnets proved to be a lot of trouble. On the first night of installation, I tried several glues but the strength of the magnets' attraction to each other was stronger than most adhesives. I superglued three magnets together on accident just fumbling with them.On the second try, I managed to get the magnets with Gorilla hot glue on the head and then put fabric over them to secure them further. Then I made sure once the glue was dry to place matching magnets onto the ones on the head, and then glue the horns to the paired magnets so I wouldn't have to guess the right side.This process was still rife with errors. I lost a couple of magnets to sheer magnetic pull on the first try and had to redo them. Furthermore, One of the head magnets wiggled itself free and attached itself to another magnet in its little pod, misaligning everything. I had to rip up the securing fabric to resituate the magnet.I used some scrap fabric to test the strength of the horns when covered in fur and found that the horns were secure but still capable of being jostled off the head. The exact horns are also heavier and larger, And this can contribute to some of the issues. I think it will suffice for this one but in future projects I'd like to plan out compartments in the 3d pieces where magnets can go or work out a better system of connection for them.

horn underside

horn topside

magnets are under the patches of fabric. LOTS of Hot glue holding this thing together.

magnet position matches the ones on the head.

Glamour shot

Testing with fur

upside down test

Improper carry test

they failed the jiggle test but didn't completely fly off


At the end of the day, the major feedback I got on my horns was that They didn't seem secure enough for any public setting. they were liable to be jostled off or could hurt someone if I was bumped and it fell off. I went back to the drawing board and cut the horns in my 3D software and made compartments for the magnets. This allowed me to make an extra space for a fourth magnet to better secure the horns. I will have to reprint the horns entirely. I started by printing the bases of the horns just to test my measurements. Now I can fur around the base and remove a bulk of the horns for travel/replacement. Aesthetically, The base sits low enough that the seam where the parts of the horn come together can be hidden with fur or worked around. A similar kind of structure could be made with EVA foam I think it's just important that the magnets be imprisoned. For their crimes. I will still have to use a thin fabric to encapsulate the magnets between the horn pieces so they don't get pulled out of their sockets.The bases were then secured to the head using CA glue and Spray Accelerant and reinforced with gorilla hot glue
and the fabric "caps" were secured using hot glue in between and around the magnets. I let the hot glue seep through the fabric. Twisting is the best way to remove them but they feel a lot stronger now and more secure to the head than before.

Top magnet compartments

bottom magnet compartments

printed base, exposed magnets

printed base

Horn bases secured to base, with fabric covering the magnet cavities.

horns printed and fully attached via magnets


The nose plates & head gemTo save time I also decided to model and 3d print these . The sculpts were made in Blender 3D and then booleaned to the head base to help ensure a good fit.With the Fur on top of the base, The plates did need to be scaled up slightly for a better fit along the nose due to the fur bulking up the area.The gold of the plates was then painted. I used washes of color to give the gold some color variety and sealed it with the triple-thick Krylon Clear coat I used for the teeth.
Patterning the Fur
Attempt 1:I am taking fewer images with this step as there are many furring tutorials and I am far less familiar with this process and focusing on getting it right.With the horn bases secured and a game plan in place for most of the features, the base was ready to be furred. I opted for keeping the top and body jaw mostly disconnected and tested the jaw several times as I connected the pattern farther toward the back. It was at this point that I bought a neck pattern on Etsy by Sheenitude to have for later.I have much less experience with patterning and used Paper tape. This proved to be a horrible Idea. It either didn't cling enough or wanted to absolutely destroy the thin EVA foam I used for my ears. I did manage to get it off but think that the seran wrap and duct tape method would be much better.As with all the other materials I took into account proper handling and PPE for the tasks. I wore a mask when handling fur, Kept it to a contained location, used the hand vac as I went and assured my door was closed off to my cat until the area was cleaned up. You REALLY don't know how much fur ends up flying around until your cleaning it up and still finding particulates on stuff the next day.I tried to mark out my seams as best I could, Taking into account the curves in the face, where the fur needed to switch direction and where I needed to use different kinds of furs, I have been finding that as a beginner with a sewing machine it helps to try to break down and simplify your patterns, and try to find connecting areas with straight lines as these are easiest to sew.I gently used a razor to slice the patterned peices being careful not to damage the base or foam too badly.I also used the method for cutting fur where you flip it upside down and use a sharpened craft night to cut the backing to save as much fur as possible. I left a lot of seam allowance on the fur in order to machine sew the large areas. These will get trimmed down later.I did struggle with the nose. I initially got a gold marine vinyl to use because if its fleshy texture. The material was far too thick and unforgiving for me and I changed the plan to use the soft purple minky instead with better success.I continued through cutting most of the head pieces and trying to sew them together via machine.

I don't "nose" what I'm doing

Untitled

Untitled

Untitled

Untitled


And as I pieced it all together I started to run into issues:
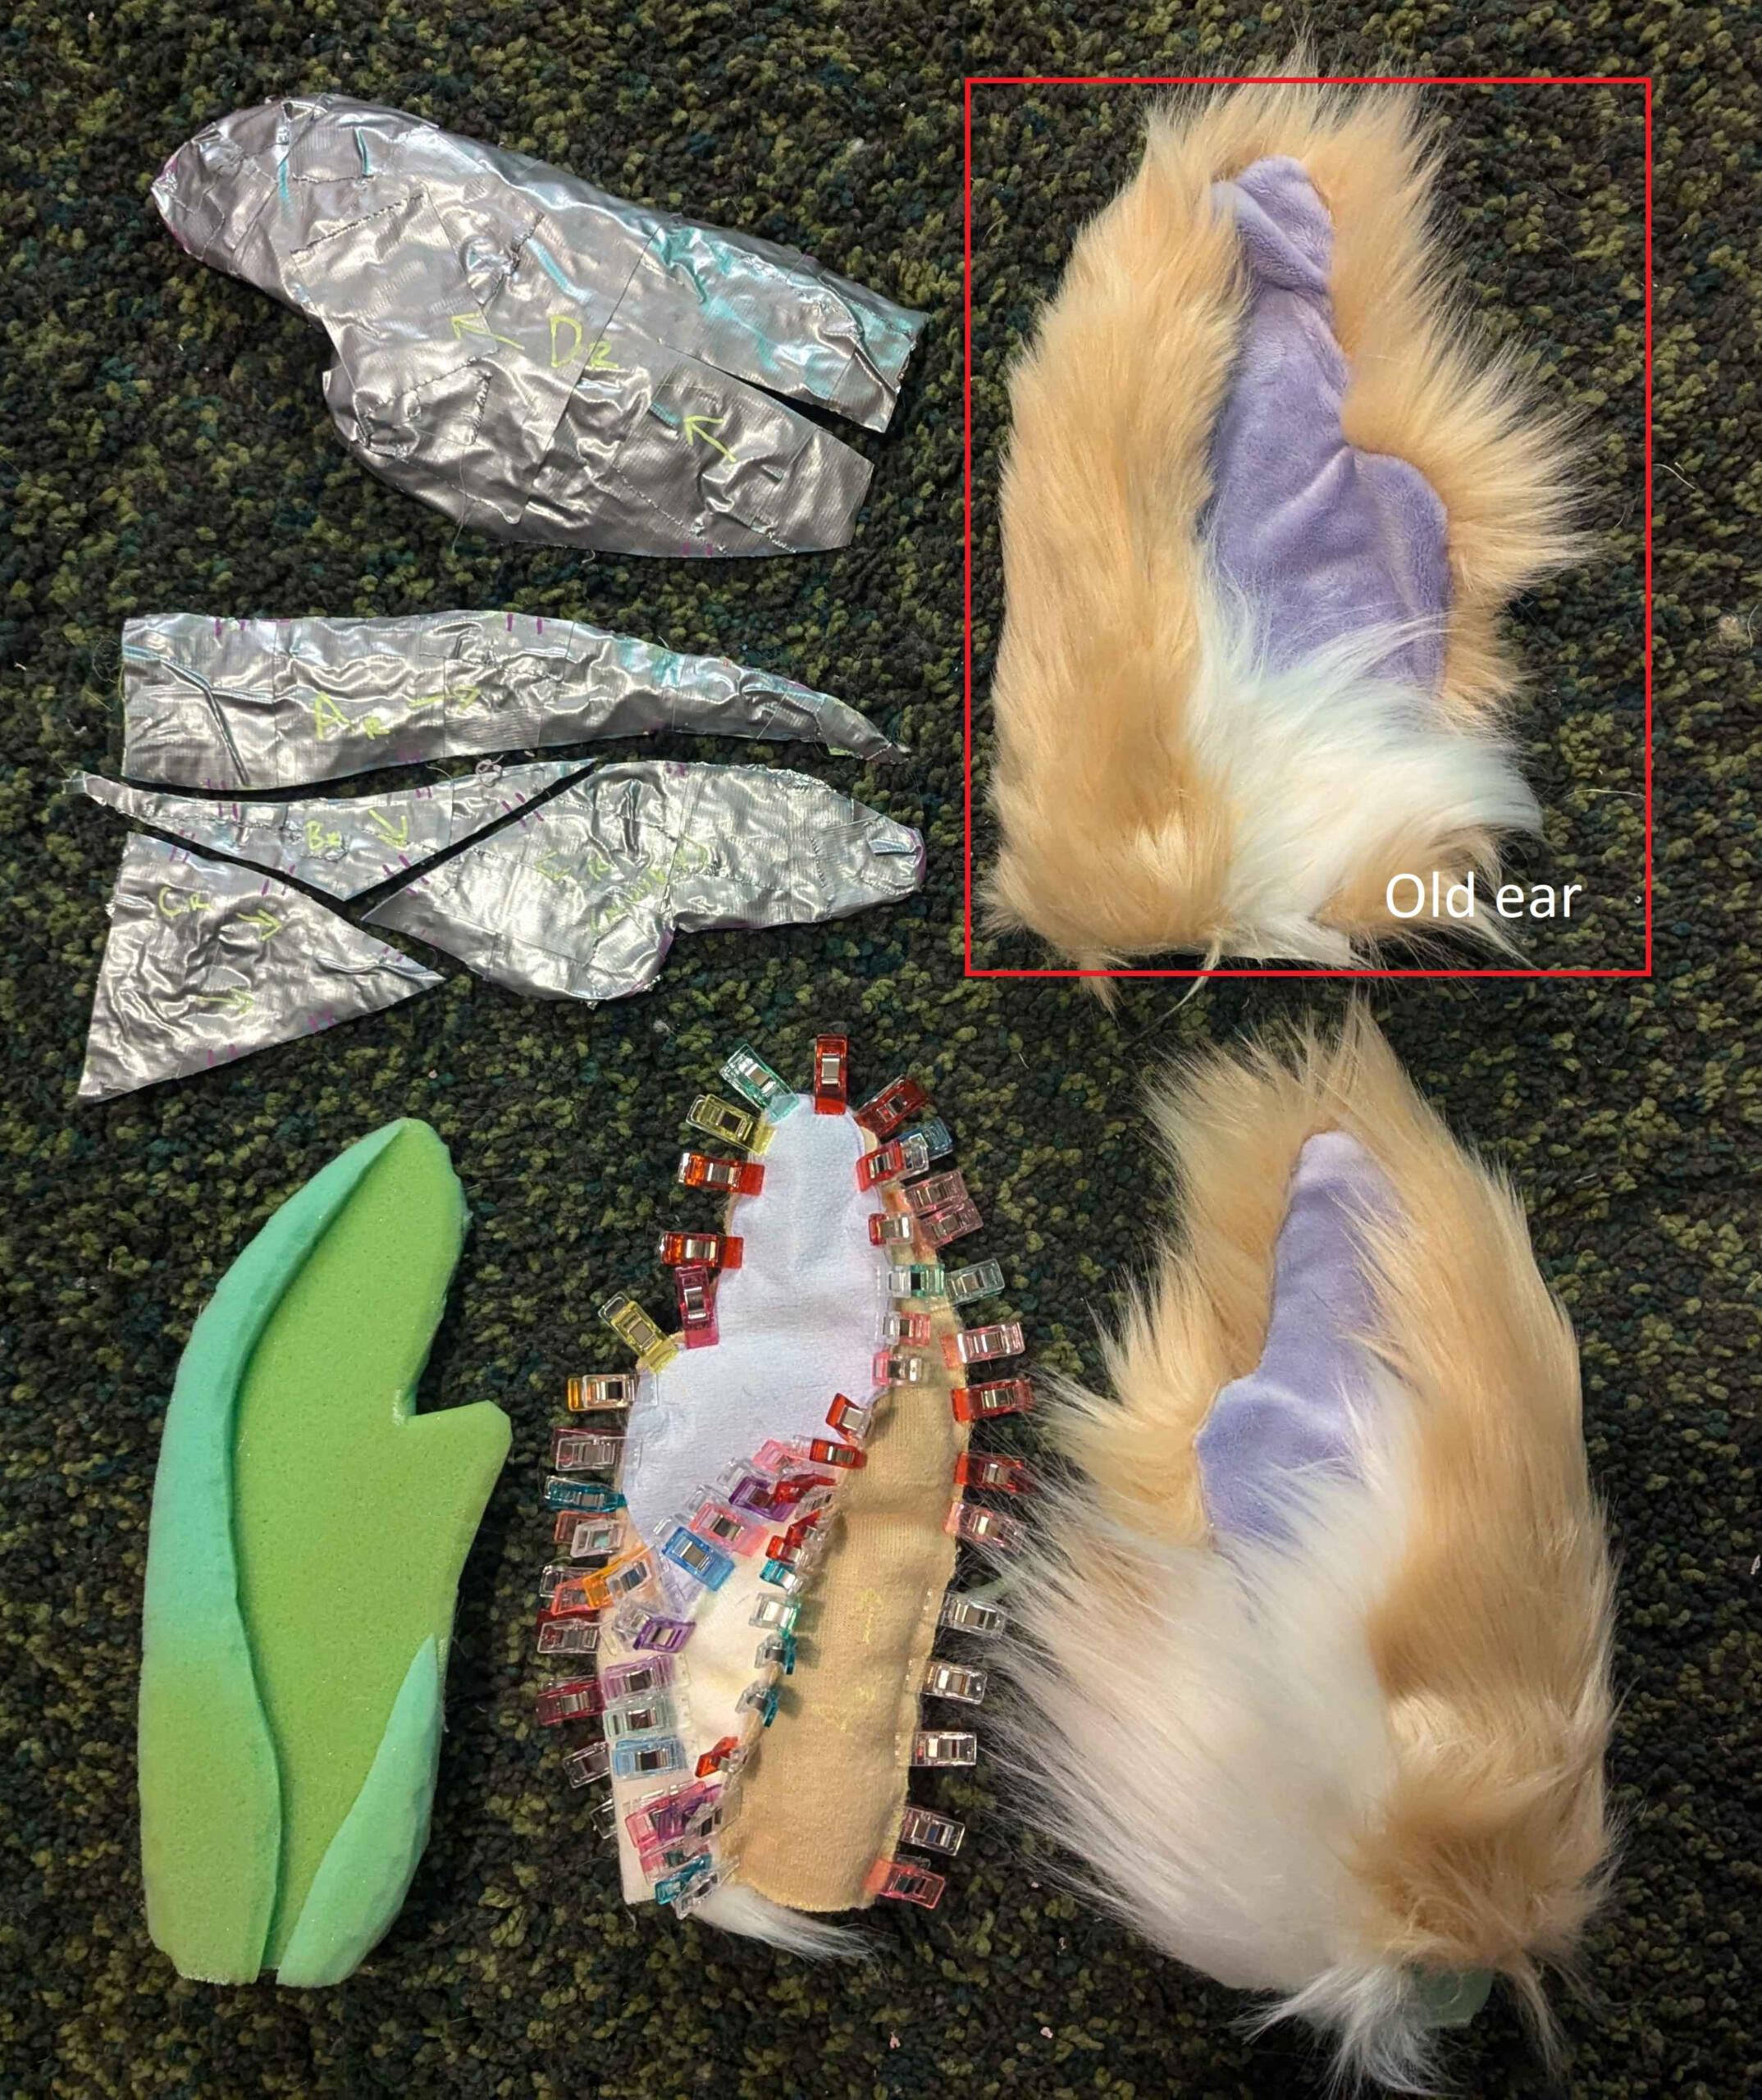
Problem 1: The ears wrinkledDespite all the careful steps taken I ran into several issues. My first was with furring the ears. Upon glueing and stitching the ears I realized that the minky was buckling. This happens because minky is stretchy and as the glue holds part of it in place, the final stitching still pulls on it and creates wrinkling. It was not something I could ignore and it eventually led to me scrapping the ears and remaking new ones. This time I applied light-weight fusible interfacing to the back of the minky parts of the ear to give it more stability and decrease the stretchy quality of the material. I did take the opportunity to create more shapley ears and change things about the pattern. Around the time of this, I encountered other issues with the patterning of the head and switched to a hand blanket stitch for many parts of the face.
Problem 2: Too much fabric in the nose bridgeWhen I patterned the nose, I tried to use one half to create a single nose bridge piece by tracing both sides close together and cutting it as a single piece. This led to there being a lot of extra fabric in the nose bridge which was creating issues that would lead to a lot of loose and undesired wrinkled in the face "skin". I needed to take care of this before glueing anything down. I resolved to taking the nose in and this was also the point where I considered repatterning the head entirely.To help the issue of the muzzle, I removed it and seam ripped the cheeks off, I then replaced it on the head inside out and pinched the excess into the center with clips to show where i needed to create new cuts. I also trimmed the muzzle into a simpler shape at this point as well. Once the new cuts were made, I hand-sewed the new "dart" shut with a blanket stitch.
Problem 3: The cheek fluff was not helpingUltimately I removed the foam on the cheek. As I was furring the head I started to feel like it created lot of bulk and resulted in a wider face Than desired. I Decided to re-pattern the area without it while maintaining a longer pile length to help disguise the Jaw gap.
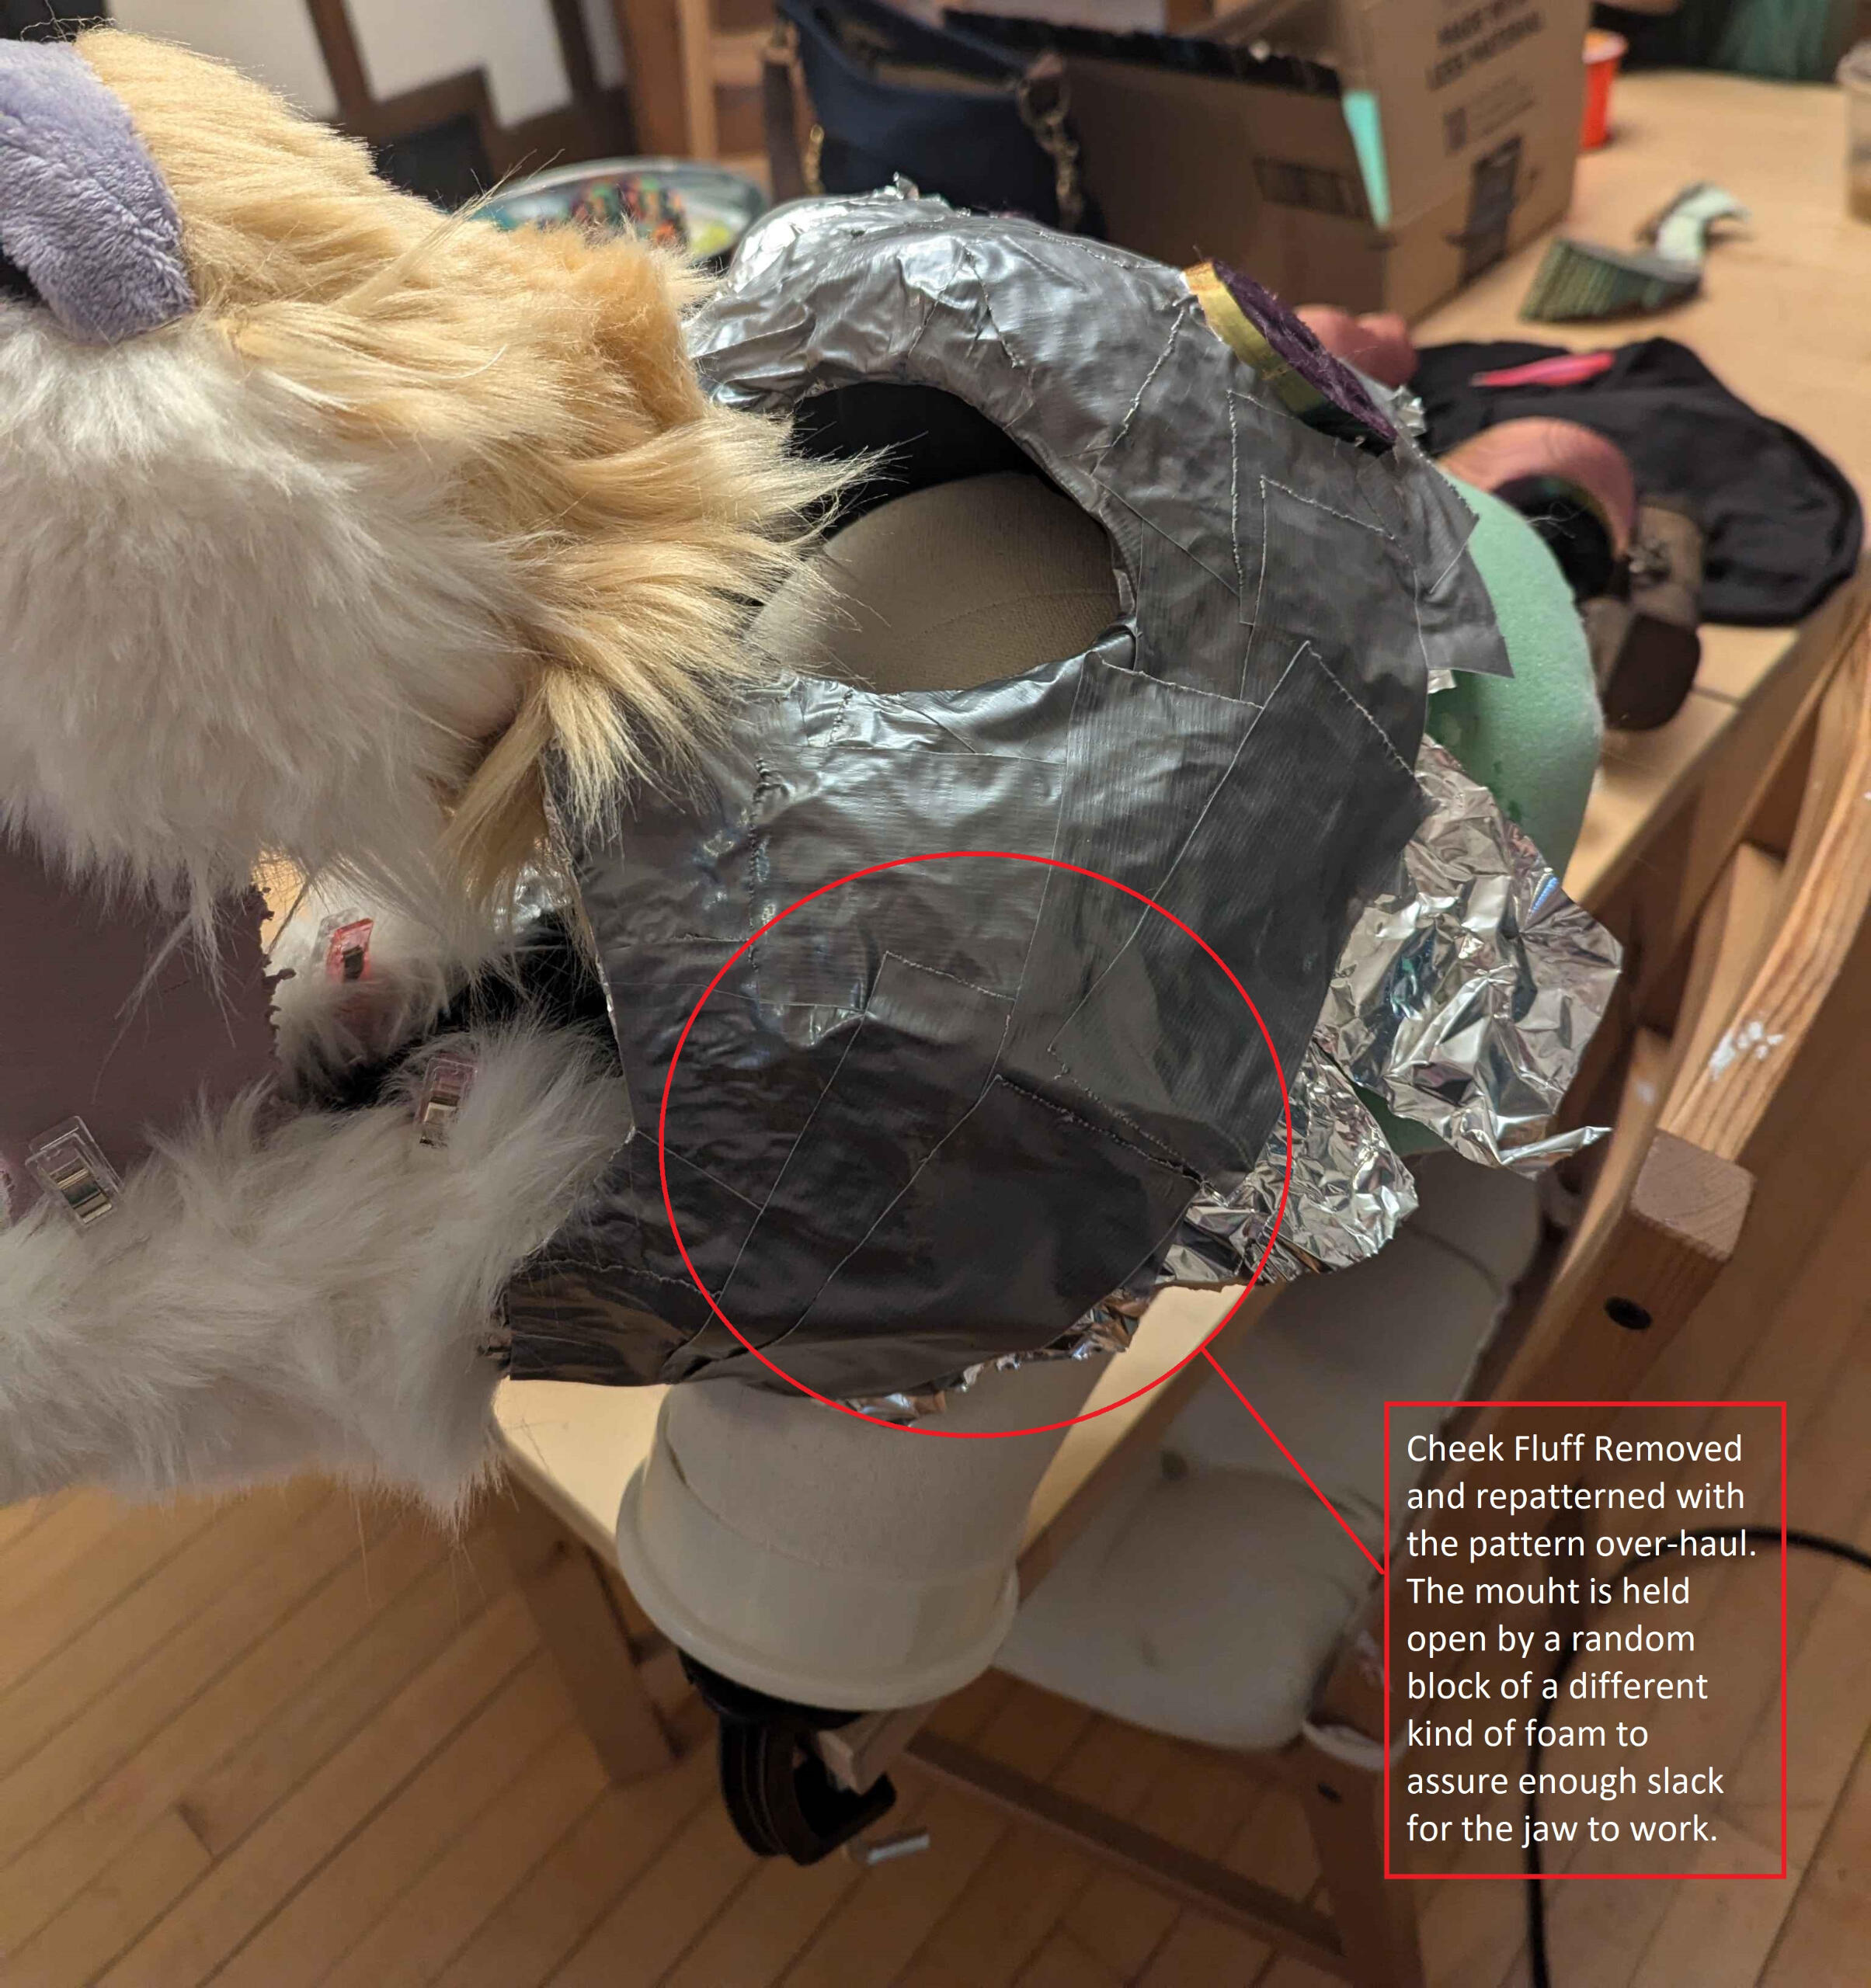
After fixing the muzzle, I decided to repattern the other parts of the face. I tried a new method this time and layered the face with aluminum foil. I forget what video or tutorial I saw use this as their base but it was easier to work with than my previous experiences with seran wrap for other projects. I then layered on duct tape since the base was protected, making sure that the new pattern would connect to the reformed snout pieces. I made edits to simplify or change the pattern as desired. This was another opportunity to make edits to the initial idea, including adding dot brows which I missed out on the first time. The pattern was much cleaner this time with the loss of the cheek foam.I also only clipped away what was needed at the time, leaving the other pieces on the base until I want to work on them. This had helped me not lose pieces or lose track of where pieces go as I'm dealing with only smaller chunks in the moment.I will also note that the addition of a table-mounted wig head also helped tremendously in correcting and visualizing the revisions and re-patterning.I decided to also use chalk pens for marking the pattern. One thing I wasn't happy with was how messy the last one was as I was trying to figure things out. Not only was it the closest writing utensil in my vicinity, but it allowed me to wipe off and restructure the patterns easily.Another huge turning point was the decision to hand-sew the face with a blanket stitch. This helped the seam but also with accuracy.


Continuing the headAt this point, many of the issues I was having at the time were worked through. I just had the remainder of the pieces to cut and sew. I continued with this task until The entire face was put together. I then patterned the back of the head and did the same with little to no issue.The next step I took was to work on the neck. I downloaded a pattern for the neck instead of patterning it myself. The pattern I used fit me perfectly, so I needed to make no adjustments.You can view that pattern here by Teacuplion Fursuits


Although breaking down the patterning into sections did help to make the project more digestable, this would prove to be a mistake as I discovered that the head, once finished, did not properly fit to the neck. I patterned an extra length of fabric that would help the two meet by taking the circumference of the top of the neck and the bottom of the head area. I essentially opted to "bridge" the pieces.Unfortunately, this fixed one problem and caused another. The "bridge" added an even amount of extra fabric around the head which was only needed in certain areas. This meant that when worn, there was extra fabric in the back of the head that caused a "bunching" and an undesired ledge of fabric in the back.The only solution to this was to carefully hack away the extra fabric and ladder/hidden stitch it up. I took care not to cut away too many fibers that would be needed to blend and hide the cut away parts.This was a necessary step to continuing and the project was put on pause until this could be dealt with properly.Next time, I will be patterning everything in one go and possibly making the neck first to ensure the pieces can fit to it.You can see the before in the video on the desktop browser and the results from taking it in in the image below.
Shaving (finally)Shaving went shockingly well. I wore a respirator and closed off the room to my cat until the shavings were cleaned up. I went through carefully tapering and cutting down the fur. In some moments, I would use a guard to get a general rough cut, and then pass over it with my razor without a guard and gently pass over it to try and smooth things out and get a consistent shave.The first pass was still pretty rough, but because I was careful I still had enough length to go back in once I took a break and let me eyes and mind relax.One of my maker friends enlightened me to a great tip that really helped: You can use a regular shaving razor and spritz the suit with water, gently pass the razor over shaved areas and it will help smooth out some of the choppiness.


Odds and EndsI finished gluing in the teeth and nose-plate.EyesI hand painted the eyes with acrylic paint markers, and then blended out several colors by burnishing them with colored pencil and went back and forth until I got the look I wanted and used a solution to smooth out the layer lines on the printed blanks. I then painted them my desired color and used a matte clear sealant on them.Blooper: I had them colored and ready once and went to spray them down with the sealent, only I grabbed the wrong can and blasted them with white paint. I think the new ones are even better.I followed this tutorial for velcro eyelids and liner.


EarringI took some time and 3d-modeled, printed, and painted an ear cuff for her.Mane
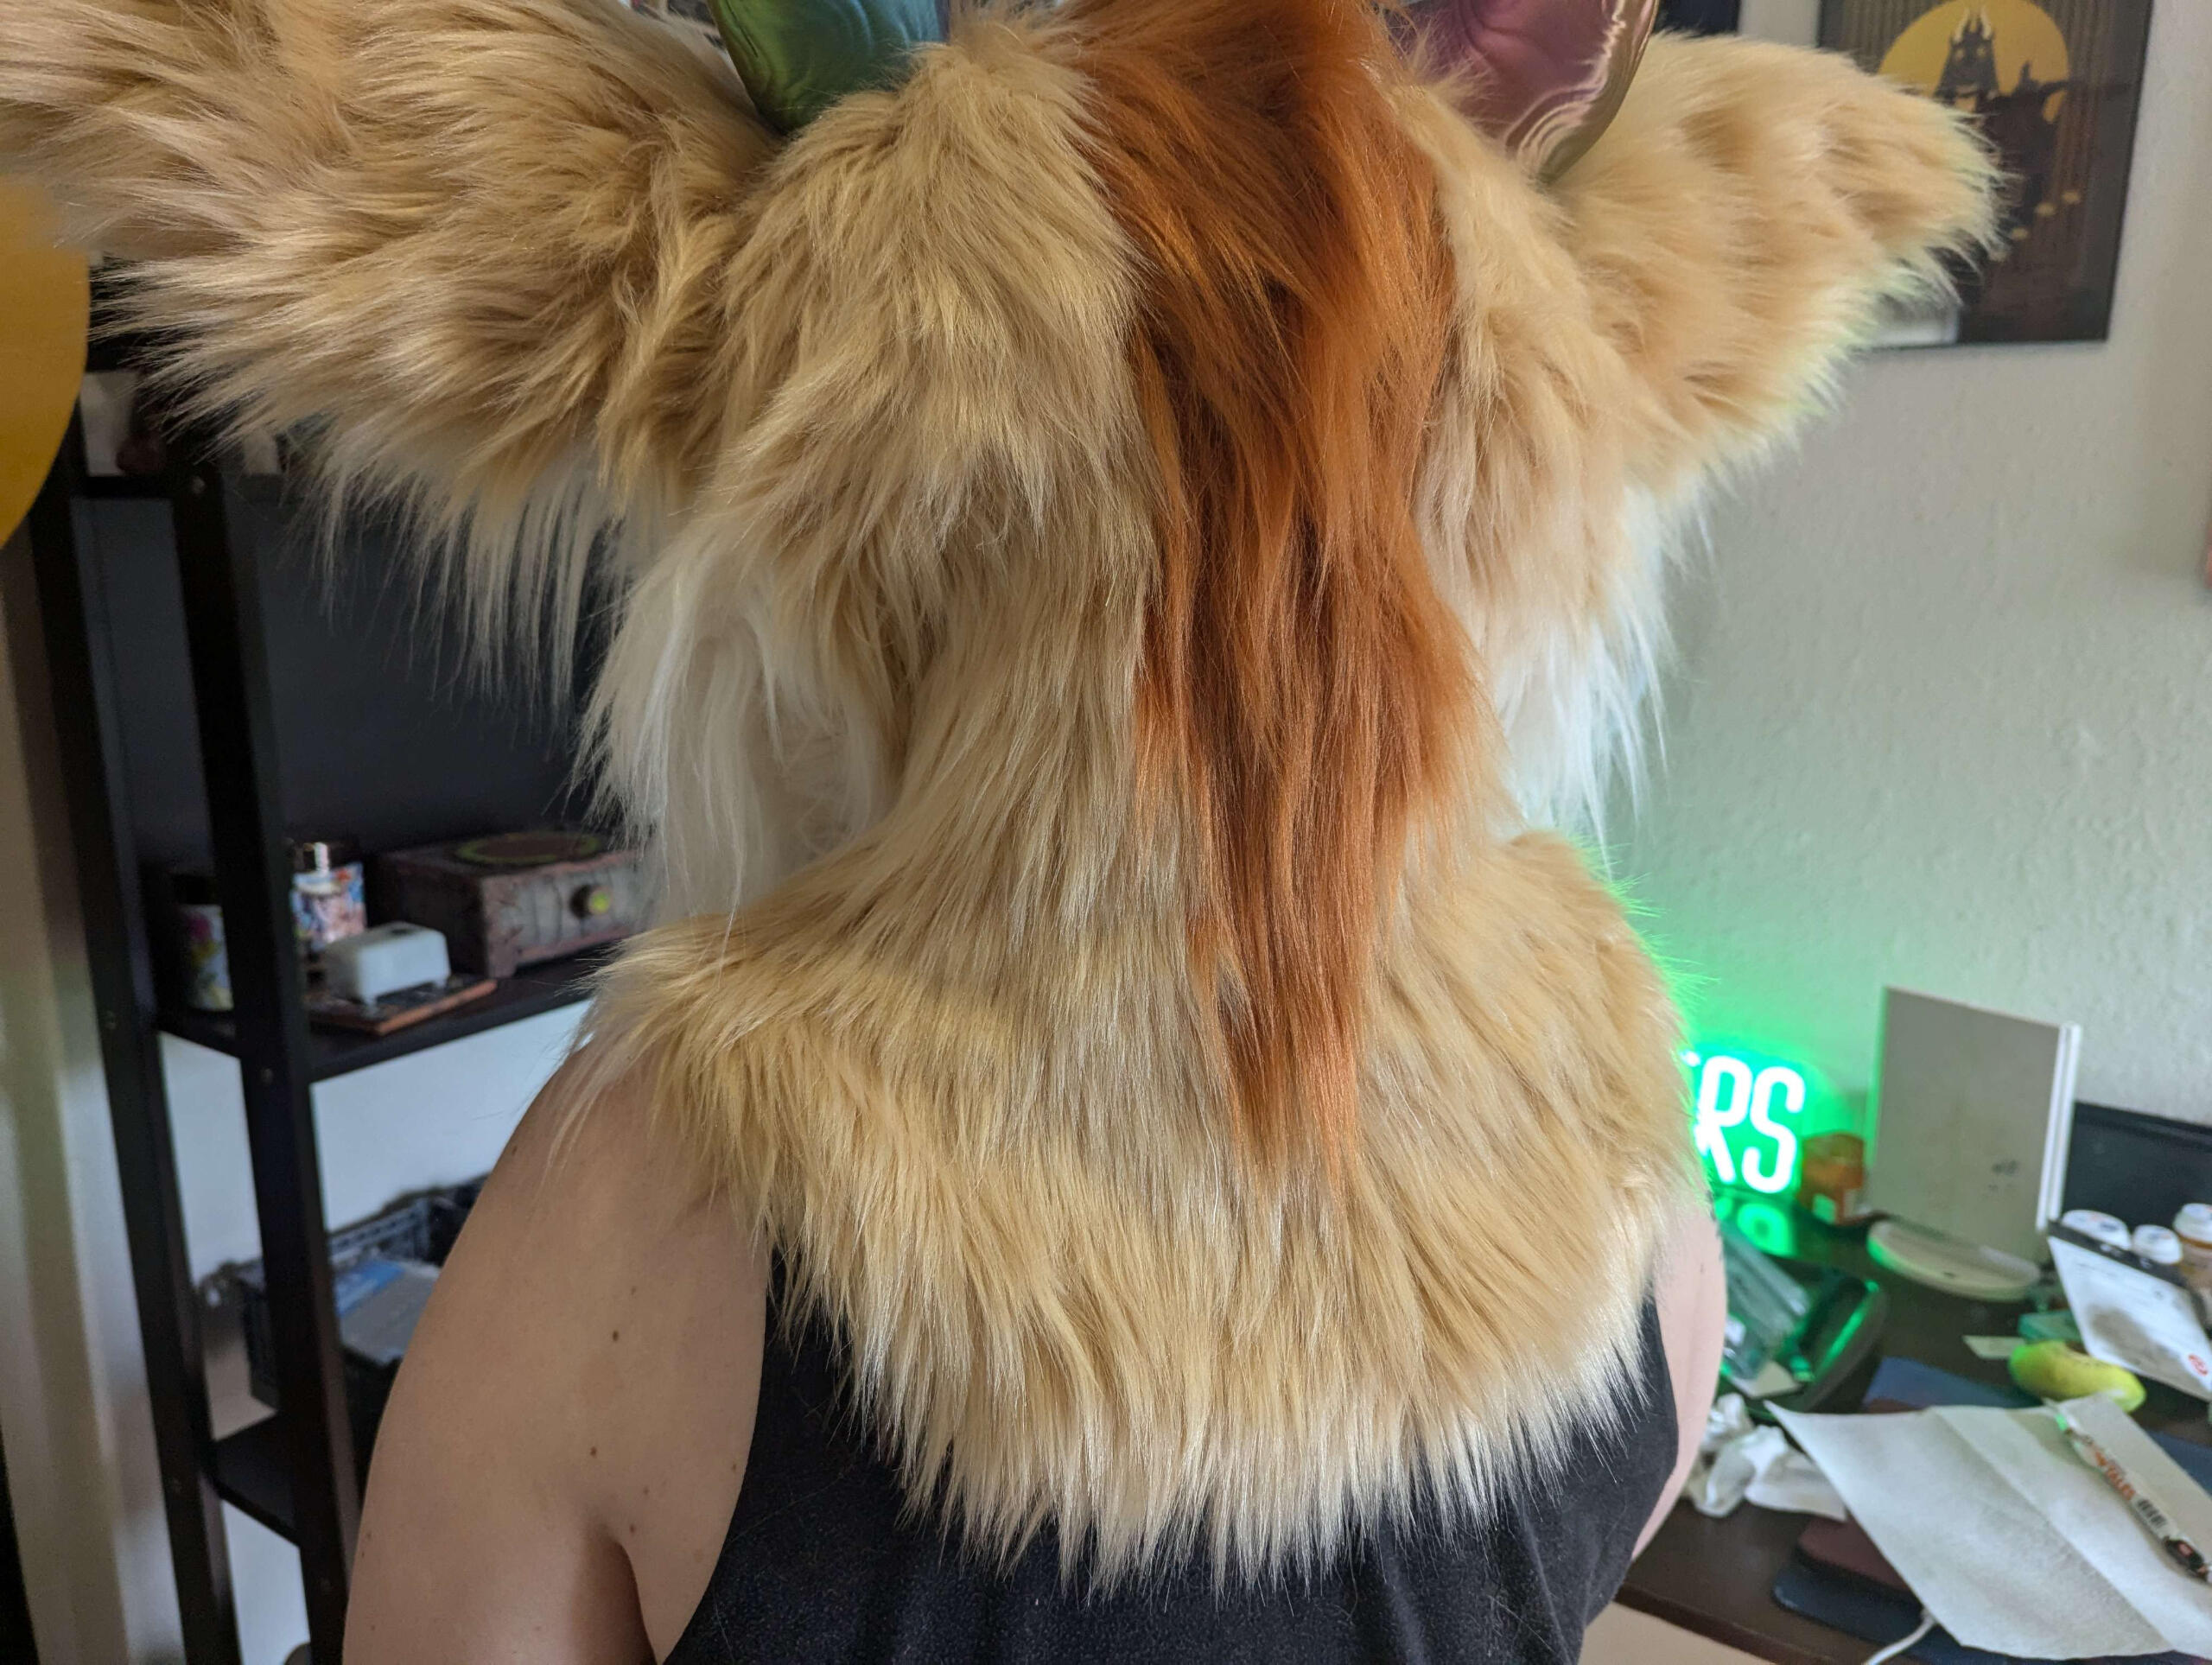
The Mane was hand-wefted using Kazul's Tutorial available here. I sewed the wefted mane into the head with a ladder stitch and then used a comb and hair scissors to style the mane.


Finishing and next stepsThe head is only the first part. Anzu will start to come alive through performance, through props, and further outfit design. She will still need her paws, her feet and tail, and dedicated styled outfit. For now, the head is complete!


1 I will note that is worth considering purchasing their newer models as they have the jaw hinge incorporated into the mode for easier aligning and preparation. I'm sure the new ones have a lot of other little tweaks that make them more efficient as well.
If you found this documentation helpful, please consider a small donation to keep me caffeinated and doing more stuff like this :)